|
 Finally! The drywall is hung and ready to be finished! This step is critical to making sure you basement finishing project comes out the way you want it. If you mess this part up, it won't matter how straight you've framed the walls, or how perfectly you've hung the drywall, your finished basement will look sloppy and unprofessional. If you remember back to drywall estimates I had quite a bit of trouble finding a competent drywall finisher. Finally! The drywall is hung and ready to be finished! This step is critical to making sure you basement finishing project comes out the way you want it. If you mess this part up, it won't matter how straight you've framed the walls, or how perfectly you've hung the drywall, your finished basement will look sloppy and unprofessional. If you remember back to drywall estimates I had quite a bit of trouble finding a competent drywall finisher.
After debating doing it myself, and realizing I had a less than stellar track record with drywall finishing, I decided to leave it to an expert. I went with a drywall guy who worked for my brother-in-law, and whom I new I could trust. He agreed to work at a straight hourly rate of $25/hr, and estimated it would take 15-25 hours to finish all of my drywall (about 50 sheets).
Drywall finishing: Day 1
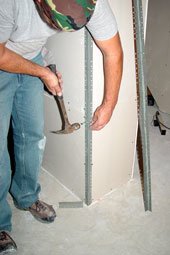
 Dan came the first day after work to get a look around the basement. He gave me a shopping list of how much mud, and what kind (un-mixed, light weight) to buy, and told me how much corner bead I would need. He was back a few days later to get started. The first day was the busiest. He installed all the corner bead, put a coat of mud over all the taped joints, and hit all the screws with a thin layer of mud. Dan came the first day after work to get a look around the basement. He gave me a shopping list of how much mud, and what kind (un-mixed, light weight) to buy, and told me how much corner bead I would need. He was back a few days later to get started. The first day was the busiest. He installed all the corner bead, put a coat of mud over all the taped joints, and hit all the screws with a thin layer of mud.
Drywall finishing: Day 2
 Dan came back the next day and put a thicker coat on over the joints, and the first coat on the corner bead. It took a few days for that coat to dry. I bought a dehumidifier to speed the process along. Dan came back the next day and put a thicker coat on over the joints, and the first coat on the corner bead. It took a few days for that coat to dry. I bought a dehumidifier to speed the process along.
FAB Tip: Make sure each coat of mud is COMPLETELY dry before you apply another coat. Since you're going to need a dehumidifier anyway (who wants a damp basement) this is the perfect time to buy one. Running it on high for a day or so helped the mud dry thoroughly.
Drywall finishing: Day 3
After one more coat, he was ready to sand! I’m sure if I would have done it myself, I might still be down there trying to get everything perfect.

First coat of drywall mud to tape all the seams

Finishing the corner bead

Three coats of mud and ready to sand!
Continue on to drywall sanding!
|
